
Home . GPS . Download . Business . Partners . Contact . Family . AVL . Links . History . AsOnTV . Forum
GPS Software on Pocket PC User Guide
Updated 1600 Monday 21st June 2010 UK time
Home . GPS . Download . Business . Partners . Contact . Family . AVL . Links . History . AsOnTV . Forum
GPS Software on Pocket PC User Guide
Updated 1600 Monday 21st June 2010 UK time
 This page provides a simple explanation of how to use GPSSppc, GPSS on the Pocket PC.
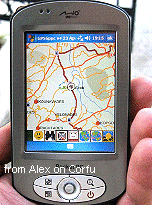
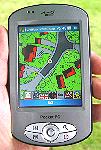
GPSSppc runs on a Pocket PC based GPS, such as the Mio seen here on the left, or many other platforms such as smartphones running Microsoft Windows Mobile. You obviously need a GPS, either as part of the platform, or connected to it.
I try to keep this page up-to-date with the latest beta version of GPSSppc.
Please see the
Pocket PC
page for details of putting GPSSppc onto your Pocket PC.
Please see the
beta testing
page for the latest version of GPSSppc.
Please see the
PPC Users
page for the good people helping us test GPSSppc.
Robin Lovelock, Sunninghill UK.
 June 2010.
The GPS will automatically update the "car" position shown as a white circle. The map will change to follow where you go.
It will also show a pointer in direction moved, and drop a
trail of dots, to show where you have been.
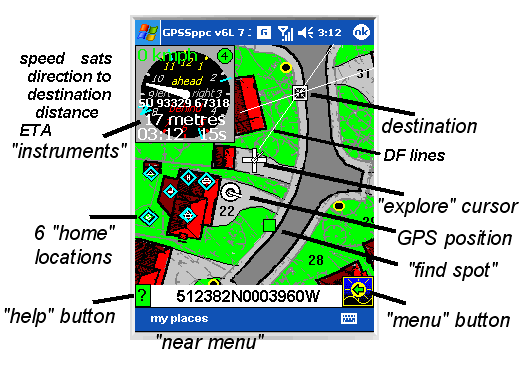
Tapping on the [?] button, on the low left, will display and speak help.
Tapping the [menu] button, on the right, will show the next page of buttons.
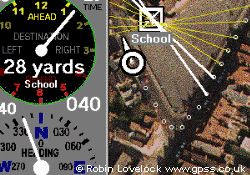
If you have a "destination", it is shown as a white square.
The "instruments" show you the direction to the destination and other information such as speed, altitude, rate of climb or descent, Expected Time of Arrival and time until arrival at the destination. The number of GPS satellites tracked is in the top right corner, and the colour of text changes to show if the GPS is tracking: yellow: not yet, green: OK.
Six "home" positions are shown as blue diamonds. These can be moved by saving the GPS position, and retrieved as a destination later. e.g. to guide you back to places like "home", "car", "hotel", "work", "water" or "base".
The "explore" cursor appears as a white cross when you tap on the map. It will vanish if you don't tap the map again within 30 seconds. You are in "explore mode" when you see this white cross, and the map will change to follow where you tap. After 30 seconds the map will follow the GPS position again.
 The majority of people using GPSSppc do so in Portrait mode. Sometimes this
is because their GPS cradle or car mount is designed only for Portrait mode.
The user interface, including things like button layouts, was developed with
Portrait mode in mind.
The majority of people using GPSSppc do so in Portrait mode. Sometimes this
is because their GPS cradle or car mount is designed only for Portrait mode.
The user interface, including things like button layouts, was developed with
Portrait mode in mind.
GPSSppc also works in Landscape mode, and you can switch between Portrait and Landscape while GPSSppc is running (using the Windows Mobile drop down menu and "settings").
When in Landscape mode there is more room for buttons: two extra buttons and a full width "help" button. When in Landscape mode, most of the pages have the "speak" and "instrument panel" buttons added. For the second "expert" page, where these buttons already appear, the "home" and "destination" buttons are added.
 On startup you will see a blue page with the Sunninghill Systems logo similar to that on
the left.
If the GPS is not connected, or not working, you will then see a green map with red houses on it and
hear Robin speaking, saying things like, "Armitage Court, home of the GPS software".
On startup you will see a blue page with the Sunninghill Systems logo similar to that on
the left.
If the GPS is not connected, or not working, you will then see a green map with red houses on it and
hear Robin speaking, saying things like, "Armitage Court, home of the GPS software".
 GPSSppc
will settle down with a GPS position at 22 Armitage Court, and the
destination a few yards away.
GPSSppc
will settle down with a GPS position at 22 Armitage Court, and the
destination a few yards away.
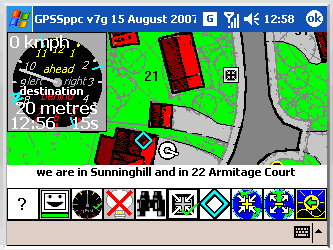
If your GPS is working, it will automatically change map to your real GPS position.
Every minute it will describe the position, and
where the destination is relative to you.
e.g.
"we are 25 miles west of London in Sunninghill.... destination 25 yards ahead at your 1 o'clock".
Every page has a "help" button on the left, seen as [?]
 The colour indicates if the GPS is working. It will normally be green,
but if inside the house, with poor GPS signals, it may be yellow.
This is the same colour as the "GPS light" on the instrument panel.
The colour indicates if the GPS is working. It will normally be green,
but if inside the house, with poor GPS signals, it may be yellow.
This is the same colour as the "GPS light" on the instrument panel.
Tapping the help button will make GPSSppc give help for the page of buttons that you are on. It will play sounds to explain each button and a small white pointer shows which button is being spoken gpsspuse.
It may also show pictures, to explain particular details, such as use of the search facility.
You can stop this spoken help just by tapping any button or anywhere on the screen. This is needed because some help may take a long time to be spoken.
All the help can be configured by Solution providers, since it consists of simple text files, sound files and picture files. It would normally be available in several languages.
![]()
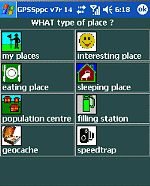 This "learner mode" page of buttons, together with the "near menu", support
the majority of important facilities, including choosing places added by
Solution Providers (e.g. Interesting Places, Beaches, Bars, Hotels, etc),
saving a GPS location such as where you parked the car, and retrieving
the location as a destination, so you can be guided back to it.
This "learner mode" page of buttons, together with the "near menu", support
the majority of important facilities, including choosing places added by
Solution Providers (e.g. Interesting Places, Beaches, Bars, Hotels, etc),
saving a GPS location such as where you parked the car, and retrieving
the location as a destination, so you can be guided back to it.
These "Learner mode" buttons, from left to right are:
Selection from the [WHAT] menu cancels any destination used for guidance and switches off the instrument panel. Selection of a destination from the "near menu" (below the buttons), or from the "home menu" switches on the chosen destination and instrument panel.
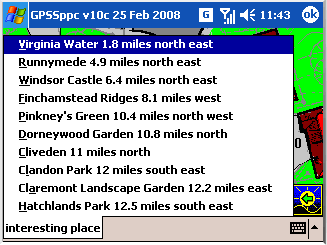
After tapping what you want to find on the "what menu", the nearest 10 places are found and a "near menu" calculated. This provides a faster way of finding places nearby. Note that this menu is only recalculated when you tap on the "what menu".

Tapping the [MENU] button results in asking the user if they are "ready for expert mode ?".
If they tap on [NO] the buttons do not change. If they tap on [YES] the first page of "expert" buttons appear.
If the user answers "yes" to this question "ready for expert mode ?", the L-plate is removed and they will not be asked again - unless it is a new day or the program is restarted. This is to reduce annoyance to expert users :-)
"Expert mode" needs to be used for other, less commonly used facilities, such as recording and replay of where you travelled, saving locations into MyPlaces, and changing settings such as the language spoken and units such as metres or yards.
![]() These buttons, from left to right are:
These buttons, from left to right are:
If you only tap the [MENU] button you will sequence around all the pages of buttons.
If you hit a different button, tapping [MENU] will bring you back to this first page.
If the destination is ON there is spoken guidance to the destination.
and it will be shown on the Instrument Panel.
e.g. ".... hotel is 550 yards ahead at your 1 o'clock".
If the destination is "OFF", no guidance is displayed or spoken, other than where you are.
e.g. "we are 25 miles west of London and 3 miles south of Windsor"
The [Find] button will normally find the nearest or next nearest place. However, if you have used the keyboard to find a place by entering part of it's name (e.g. "sunn" for Sunninghill) then tapping [Find] will look for the next place which starts with this search text. (e.g. Sunningdale). Use of the [what] button clears this search text. i.e. [Find] will then simply look for any near place.
GPSSppc can display and speak "more information" about a place, if the required pictures and recorded sounds have been added by the solution provider. These might be well known interesting places to visit, hotels, restaurants, etc.
If these pictures and sounds are available, finding a place with the [find] button will result in the picture being shown and GPSSppc will say "more information is available". The user can play the recorded sound, describing the place, by tapping on the picture. The picture is removed when he taps the [menu] button.
![]()
These buttons, from left to right are:
Tapping the [speak] button displays the "talk menu" which enables the user to control what combination of phrases are spoken.
 e.g.
e.g.
"we are 25 miles west of London ..."
( where are we ? )
"moving west at 35 mph"
( direction and speed of movement )
"500 yards ahead at our 11 oclock"
( distance and direction to destination )
"ETA is 1130 in 5 minutes"
( Expected Time of Arrival )
"altitude is 650 feet, climbing at 20fpm"
( altitude and rate of climb or descent)
"we are near school, on our left"
( calling out landmarks as we pass )
Note for Solution Providers: the above 10 lines of text are held in TALKTEXT.TXT.
tapping the lower, white area of the screen switches them all on or all off.
Tapping a button or the example phrase, toggles that item on or off.
If the user exits with the [menu] button and there are none selected, then he gets the feedback, "OK I'll be quiet".
Otherwise, that selected combination of phrases are spoken, then repeated regularly or as required.
![]() These buttons, from left to right are:
These buttons, from left to right are:
If you are in "explore" mode, the explore position is used, instead of the GPS. See "explore mode" below.
You can also save a destination location found with [FIND]
(e.g. "Interesting Place", "Population Centre", etc).
You use [DES->Home] or [DES->MyPlaces] for this.
[GPS->My Places] or [DES->MyPlaces] will add the GPS location or destination to "My Places" for later retrieval with [FIND] after selecting "my places". An automatic name based on the time (e.g. 13:35) will be seen in the text control at the top of the page. You can change this (e.g. "Car Park"). If you do not change it from the default name, you are asked to confirm.
The [DELETE MyPlace] button enables you to delete places that you have saved. You do this by using [find] explained earlier, to find the place in "my places". You then tap on [DELETE MyPlace].
If you have not selected a place in "my places", or you try to delete one of the first 6 places (protected for use by solution providers), it will refuse politely. Otherwise it will ask you if you are sure, before deleting that place.
![]() These buttons, from left to right are:
These buttons, from left to right are:
The "explore" cursor appears as a white cross when you tap on the map. It will vanish if you don't tap the map or a button* again within 30 seconds. You are in "explore mode" when you see this white cross, and the map will change to follow where you tap. After 30 seconds the map will follow the GPS position again.
* Most buttons simply resets the explore timer for another 30 seconds, but the first four "map control" buttons can be used as a quick way to exit "explore" mode.
Searches with the "Find" button are from this "explore" position.
If the "explore" cursor has timed out, then searches are from the GPS position.
You can make the explore position the destination, by tapping on the [destination ON] button - this will exit explore mode immediately. You can also exit explore mode by tapping one of the "map control" buttons.
The explore cursor has a direction pointer, based on the direction in which the user taps across the map. This direction is reflected in how information is displayed and spoken, such as distance and direction to the destination, or where a place is that has just been found after a search.
Explore mode is not available on the recording and playback button page. Tapping the screen here results in a position being recorded instead.
GPS latitude and Longitude is displayed when on the maintenance page.
The [RESET] button resets GPSSppc to the "Factory Settings" such as speaking English.
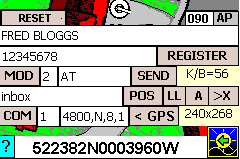 The maintenance (or "experimental") buttons are important to get your GPS working if it is not on COM1.
First try the [< GPS] button which searches automatically for the GPS.
The other controls including [COM] are used to change the GPS settings such as COM port and speed. The default GPS settings are 1 and 4800. i.e. COM1 at 4800 baud.
Those further up including [MOD] do similar things for the modem on smart 'phones for remote tracking (experimental use only). The AT and [SEND] at the top are also for experiments with a modem.
"K/B= 65" means that the last character typed on the keyboard was an "A" (ASCII code 65). This is used for testing of keyboards on different Pocket PC platforms.
Above the MENU button you see [240x268] which is the screen size GPSSppc detected on startup. Check this if the screen layout looks wrong and tell Robin.
"inbox" is shown here where the user can enter a position. e.g. 512381N0003959W is one of the many position formats GPSS and GPSSppc will recognize. [POS] puts the car at this position and is used for testing.
[LL] switches format of the displayed position:
[A] changes the platform. e.g. from "car" to "aircraft". See "speaking altitude ..." below.
[>X] or [>OK] swiches the button in the top right of screen to [OK] or [X]. When [OK] GPSSppc is aborted. When [X] GPSSppc is minimized.
The [AP] button was added in GPSSppc v11 to support the sailing AutoPilot function.
 Every minute the position is spoken:
"we are 25 miles west of London in Sunninghill"
Every minute the position is spoken:
"we are 25 miles west of London in Sunninghill"
This is for use on foot, in a car or in a boat.
When used "in the air", such as in an aircraft, or
hot air balloon
you can make it say "over" instead of "in":
"we are 25 miles west of London over Sunninghill ..."
It can also speak altitude and rate of climb or descent.
"altitude is 2444 feet above sea level ..."
"climbing at 250 feet per minute ..."
You will also see this information on the instrument panel.
The [A] button on the "maintenance" page switches the platform between "car", "boat", "aircraft", "balloon" and "man".
After exit of the program with [OK], this is saved as "platform" in GPSS.CFG, so next time the program is run, it will be in the same mode. Some may wish to try this in their car, going up and down hills :-)
![]() The record/playback buttons are used to record and play back GPS data. The baseline
includes newtrip.nme so you may like to try playing this back with the [>] button first.
The buttons are:
The record/playback buttons are used to record and play back GPS data. The baseline
includes newtrip.nme so you may like to try playing this back with the [>] button first.
The buttons are:
After tapping [>>], the "fast forward" button, you will see the speed. e.g. " x4 >> ".
With each tap of [<<], the playback speed will slow down, then pause, then reverse.
If you tap [>>] after [||], the "pause" button, playback will continue at the same fast speed.
If you tap [>] after [||], playback will contonue from the pause position at normal speed.
At the end of the recorded data, GPSSppc will stop automatically, as if you had hit [[]] "stop".
Recorded data is added to the end of the file.
If the GPS is not working GPSSppc will say sorry, and not start recording.
Normally only the RMC and GGA messages, used by GPSSppc are recorded. However, when on the maintence/experimental page, all incoming GPS data is recorded, including any GSV, GLL and VTG messages. This is to assist setup of GPS hardware by Solution Providers.
To play back newtrip.nme
just tap on [ > ] and watch Robin walk around the front of his house.
You can make similar
recordings yourself, but you may wish to change the filename to something different, using
the keyboard. If the keyboard is used while on this "record and playback" button page,
any key typed on the keyboard will start with NEWTRIP.NME or whatever was in the file name control,
before the key was pressed. You can clear all the text by hitting a single quote character,
or keep hitting the backspace key.
Please see use of keyboard below.
Explore mode is not available on the recording and playback button page. Tapping the screen here results in a position being recorded instead. This is to support recording the position of speed traps by more specialist GPSSppc users.
Remote tracking has been in full Windows GPSS since 1996. This capability is intended for use from a smartphone. i.e. to see where your car is if stolen, or you want to see where it is. e.g. the wife visiting those expensive shops :-)
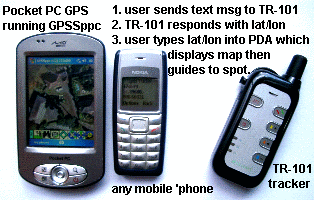
You do not need a smartphone: the simplest example is where the target being tracked has a small personal tracker like the TR-101 planted on it. A text message from a mobile 'phone will result in the tracker responding with a text message within typically less than a minute.
The text message from the tracker will include a latitude and longitude in decimal degrees. e.g. 51.3968 -0.6603. This could be looked up on a paper map, with a grid of lat/lon lines printed on it, such as from google earth. Or you could type it into google maps if you are online.
But you can also just type the lat/lon into GPSSppc running on the Pocket PC based GPS. The destination will then be placed on the maps at the target location, and you will be guided to it.
When switched to remote tracking, or after typing in the location at the keyboard, the map is switched to the mode where both own (GPS) position, and target (destination) are on the map. i.e. it will zoom out the map if the target is far away. The map can be switched to another mode, such as being centred on destination or own position, with the map control buttons described earlier.
The information below is for the more direct, but technically more difficult, tracking.
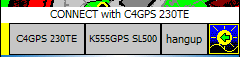
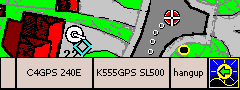
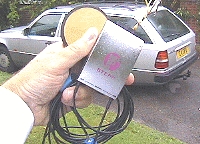 Typical professional GPS/GSM hardware is on the right.
From
left to right there is a status stripe and three buttons:
Typical professional GPS/GSM hardware is on the right.
From
left to right there is a status stripe and three buttons:
[status] - yellow stripe, [C4GPS 230TE] and [K555GPS SL500] to dial the connection,
and [hangup] to terminate the call. The text on the buttons and the 'phone numbers
dialed, to the GPS/GSM tracker units, are configurable with files GPSSDIAL.CFG
and CONTACT.CFG documented on the
AVL
page.
Note: these buttons will only appear if file GPSSDIAL.CFG
is present.
For those interested, the two cars used for test are on the
speed page :-) The status stripe goes red when one of the
dial buttons is tapped, then yellow when the connection is made, typically
10 seconds later, then green if GPS data is being received. The car will then be automatically tracked, second by second,
and the map changed to follow it. This is costing you a 'phone call, so the
[hangup] button is there to terminate the call.
 "Chase" mode is where the remote car is being tracked, typically over the mobile 'phone
network, as well as the local GPS. For more information see
Pocket PC Chase
"Chase" mode is where the remote car is being tracked, typically over the mobile 'phone
network, as well as the local GPS. For more information see
Pocket PC Chase
When in "chase" mode, the map is moved to follow the target destination. i.e. the remote object being tracked. The destination icon also appears as a red circle with white cross-hair. Tapping the maintenance mode [MOD] button switches on chase mode. Tapping [COM] switches off chase mode, returning to the white square destination icon and map control based on the local GPS. Tapping the dialup buttons also switches on chase mode.
Note that remote tracking requires the right hardware, in terms of a Pocket PC based GPS and GSM modem.
 Most platforms running GPSSppc have a "soft keyboard" that is switched on or off by tapping
a keyboard icon near the bottem of the screen.
Most platforms running GPSSppc have a "soft keyboard" that is switched on or off by tapping
a keyboard icon near the bottem of the screen.
The keyboard may be used in several places within GPSSppc:
![]() After use of the "what" button, to select what you want to search (e.g. eating places, interesting places,
etc) you can use the "find" button (the binoculars) to find the nearest place.
If you tap "find" again, it will find the next nearest place, and so on.
After use of the "what" button, to select what you want to search (e.g. eating places, interesting places,
etc) you can use the "find" button (the binoculars) to find the nearest place.
If you tap "find" again, it will find the next nearest place, and so on.
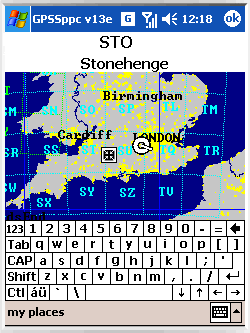
You can use the keyboard to find a place by name. e.g. Stonehenge.
But you do not need to enter all the name. GPSSppc will search for the nearest place that starts with the letters you type. It starts this search when you type the Enter key.
So imagine you had selected "Interesting Places" and wanted to find Stonehenge:
You hit the little keyboard icon and the soft keyboard appears.
When you hit the first key (e.g. S ) you will see the text entered appear at the top of the screen.
As you tap each character you will see what you typed until you hit Enter, when the search will be done.
If you only hit S before Enter, GPSSppc will find the nearest Interesting place starting with S. e.g. Shalford Mill. If you hit Enter again, it will find the next nearest place starting with S.
Typing only the first one or two letters may be enough if the place is near, but generally you may find it faster to enter more of the name to be sure to find it first time. e.g. "stoneh".
When GPSSppc finds the place it will show it on the map briefly, and describe where it is.
e.g. "53 miles behind us at your 5 o'clock".
If it holds pictures and/or sounds describing the place, these will be shown and spoken.
You can then make this the destination, so you are guided there, or search for a different place.
Note that the [Find] button, explained on the first page of buttons, will search for the next place which starts with this entered text.
The keyboard can be used for other things, such as changing the filename for record or playback (see above).
You can clear all the text by hitting a single quote character, or keep hitting the backspace key.
Currently GPSSppc does not detect when the keyboard has been switched off, and assumes this has happened 10 seconds after the last key is tapped. i.e. the text entry line that appears at the top of the screen is removed.
 This is used to display lat/lon or grid (see [LL] button on "maintenance" page above).
Here are keyboard keys used in a particular way by GPSSppc:
Hardware buttons are not yet exploited by GPSSppc.
Geocaching is a "treasure hunt" hobby which relies on the Internet and
GPS, and it started in May 2000.
These geocache positions are on the Net, and you find them with GPS.
You can find out more about geocaching on
www.gpshobby.info.
The majority of Geocachers simply search for those planted
by others.
Other Geocachers will hide a container in an interesting
location,
and will post the GPS coordinates to a Geocaching
web site page. The container, or "geocache", will include
a log book and a few low cost items as "momentos".
Those finding the cache will take an
item, leave an item, write an entry into the log
book, and then post a visit report or "log" on the web site page.
If they cannot find the geocache, then this is also reported.
GPSSppc v12f beta, and later, supports the automatic importing of geocache positions, exported from www.geocaching.com as geocaching.loc. The loc file is simply put into the GPSSppc folder and the next time GPSSppc is run, the file is converted, appended to $LGEO.GTX, and the LOC file deleted. The Geocache positions are then available through the "What Menu" and "Near Menu" above, so you can be guided to them.
 This rather specialized capability of
Radio Direction Finding, or "DF",
has been in the full Windows version of GPSS
for many years, and has often been pioneered by the Radio Amatuers, or "hams", who use
it in their "foxhunting" hobby, explained on the page above.
Objects such as birds, fitted with a small radio transmitter, can be tracked
by triangulating the bearings picked up by a suitable receiver.
This rather specialized capability of
Radio Direction Finding, or "DF",
has been in the full Windows version of GPSS
for many years, and has often been pioneered by the Radio Amatuers, or "hams", who use
it in their "foxhunting" hobby, explained on the page above.
Objects such as birds, fitted with a small radio transmitter, can be tracked
by triangulating the bearings picked up by a suitable receiver.
Special DF receiver hardware is often used, which passes the DF bearings, with GPS data, to GPSS (or GPSSppc) for automatic display. But the bearings can simply be entered on the keyboard.
Typing three digits, such as 090, ending with the Enter (carriage return) key, will make GPSSppc draw a line on the screen. The line is drawn from the GPS (or Explore) position, in the direction specified. e.g. 090 = due East, 180 = due South, 270 = due West, etc.
The line is added to a list of up to 10 DF bearings. Changing map will result in the lines being redrawn on the new map. You can clear the list, and remove all the lines, by entering 999 Enter.
If two or more DF lines cross what seems to be the target (triangulated) position, the destination can be put at this position by tapping on the map and hitting the "destination" button explained earlier.
444 Enter will draw a line from the GPS (or Explore) position, to the destination. e.g. the target position from a tracker. This is simply a means of putting a line onto the map, to make it easier to "walk the line" and find the target. e.g. a lost model aircraft.
Colours were changed on the instrument panel in GPSSPPC v13c (beta) to make easier to see by users on foot in bright sunlight. When tracking a remote target, both target and own (GPS) position is kept on map. v13d introduced more support for Direction Finding. v13e fixed bugs.